


Screenshot on mac not working? In this article you will find” Ways to Print a Screenshot on Mac,” it suggests you recently converted from Windows to a shiny Mac and have no idea where to find the “Print Screen” button, which is present on most Windows PCs. There are a few outliers, but practically every Windows keyboard includes a “Print screen” button.
Unfortunately, there is no such button on your Mac, but that doesn’t mean you can’t print a screenshot on Mac. You can, but the process is a little more sophisticated and difficult to learn, but it gives you a lot more flexibility in terms of output and what you want to Print a Screenshot on Mac.
On your Mac, keyboard shortcuts for taking screenshots may appear simple, but each method captures a different section of your screen. If you need to take Print a Screenshot on Mac, MacBook or Mac Pro on a daily basis, you’ll need to master three basic keyboard shortcuts, plus a fourth if you have a MacBook with a touch bar.
One of these methods is quite new. Apple provides a lot of tools for quickly saving, deleting, and opening screenshots for markup, which I’ve learned to love and use on a regular basis.
Best Ways To Print a Screenshot on Mac Keyboard for Windows
There are six differently fantastic ways to 6 Best Ways To Print a Screenshot on Mac Keyboard for Windows, each with three different approaches and two different outputs, but I only use two and consider myself a heavy Mac user, having taken thousands of screenshots in the last year alone, all of which have been published on these WordPress theme collections.
The different fantastic ways to print a screenshot on Mac are as follows:
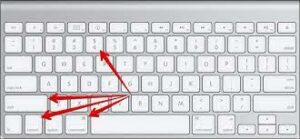
1. Command-Shift-3
This key combination will take a screenshot of the full screen.
2. Shift-Command-4
This key combination will transform your cursor into a crosshair, which you may drag to pick a part of your screen to capture. To capture the picture, release the mouse button or trackpad. After pressing Shift-Command-4, you have a few more options. Press and release the space bar, when you press and hold the space bar, the crosshair transforms into a small camera icon that you can drag over any open window. To take a screenshot of a window, simply click on it.
This method produces a screenshot with a white border around the window and a slight drop shadow. After dragging to highlight an area but before releasing the mouse button or trackpad, press and hold the space bar. This keeps the selected area’s shape and size but allows you to move it around on the screen.
If your original selection region is a few pixels off, simply use the space bar to reposition it before releasing the mouse button to take a screenshot. Release the Shift key and press it again without releasing the mouse button to adjust the right border of your selection area. By using the Shift key while keeping the mouse button or touchpad pressed, you can switch between moving the bottom and right edges.
3. Shift-Command-5
4. Command-Shift-6
Did you know you can print a screenshot on Mac of what’s now shown on the Touch Bar on the 16-inch MacBook Pro or any model with the TouchBar. To snap an extremely broad and skinny screenshot of your Touch Bar, simply press Command-Shift-6. A Bonus for MacBooks with Touch Bars.
3. Mac screenshot shortcut
the differently fantastic ways to print a screenshot on Mac, press and hold these three keys together: Shift, Command, and 3. If you see a thumbnail in the corner of your screen, click it to edit the screenshot. Or wait for the screenshot to save to your desktop.
4. Mac screenshot to clipboard
Press and hold the Control key while taking the screenshot to copy it to the Clipboard. The screenshot can then be pasted somewhere else. Alternatively, you can copy it and paste it on another Apple device using Universal Clipboard.
5. Ways to crop a screenshot on Mac
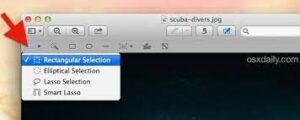
To change the image size, select “Adjust Size” from the Tools menu. You can adjust the width, height, and resolution of your screenshots using this method. Crop by going to Tools and selecting the “Crop” option. To change the colors, go to the Tools menu and select “Adjust Color.
6. Saved screenshots location on Mac
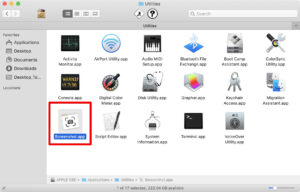
Screenshots are saved to your desktop with the name ”Screen Shot [date] at [time].png” by default. From the Options menu in the Screenshot app on macOS Mojave or later, you may change the default location of stored screenshots. You can also move the thumbnail to a folder or document by dragging it there.
Find out more:
With the Screenshot app in macOS Mojave or later, you can additionally specify a timer and determine where screenshots are saved. To open the app, press and hold the Shift, Command, and 5 buttons at the same time.
Find out more about the Screenshot application. You may not be able to snap screenshots of some apps’ windows, such as the Apple TV app. Press and hold the Control key while taking the screenshot to copy it to the Clipboard. The printed screenshot on Mac can then be pasted somewhere else. Alternatively, you can copy it and paste it on another Apple device using Universal Clipboard.
Conclusion
to print a shortcut on Mac, keys, Command+Shift+3 prints the screen to a file on the Mac desktop, whereas Command+Control+Shift+3 prints the screen to the clipboard. Keep in mind the differences between the two and select the one that best suits your needs.


